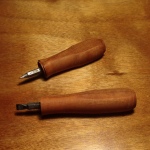
This is how most of my projects go; at least those that do not begin with a set of plans.
It all started with a revolver.
Last summer I bought myself a cap-and-ball revolver which I had desired for a long time. I enjoyed making lots of black powder smoke with it while shooting at targets. Then it came time to clean it. None of my screwdrivers would fit the slotted screws. A bit of research revealed that they were a special size (which was obvious) and that I needed a set of “gunsmith’s” screwdrivers. A quick google then told me that those cost a bit much for something that often came for free with a new drill so I decided to grab one of the many drill-driver tips that I had laying around and grind them to the correct size. Then I would turn some cherry scraps into a handle.
Then it all became a blur of activity. Like this:
Get out the lathe from under the router table and turn some quick handles.
Realize that the belt is broken.
Contact the vendor – item is discontinued.
Figure out what the belt must have looked like. Order one from amazon. Wait one week. Install belt.
Fix lathe – turn handles. Hmmm… tools are dull.
Get grinder from under bench and set up on router table. Never use that router anyway. Sharpen tools.
Grind the screwdriver tips down to size.
OK, screwdriver tip is too long, I’ll just cut off the excess with my hacksaw. Whoa! The hacksaw is just skating across the surface of the old screwdriver bit (now a gunsmith screwdriver); drat! It’s hardened steel.
How to cut this? Grinder! Need a cutoff wheel in an angle grinder. I have an angle grinder but no cutoff wheels. Well, stick the angle grinder in the vise, put on the face shield, and try grinding it apart using the corner of the grinding wheel.
Works but slowly. Forget that this makes things really hot. Drop bit on floor. (Profanity optional) Get some ice and cool off the bit. Done!
Get small drill press and put on bench.
Figure out which drill size to use. Hey, that’s 1/4″ – use a brad point so that you’ll hit the center.
Can’t find brad points so use regular twist drill. Wander off center.
Search for epoxy. Oh yeah, that last bunch leaked all over the shelf and was thrown away. Hey, here’s some JBWeld. Can’t remember what I bought that for but it will probably be good enough. Use that.
Glue tips into handles.
Grab Watco Danish Oil. This will be quicker if I just dip them. Find something that might suffice. Here’s a Mason jar. What’s that black stuff? Could that be gunpowder? Probably nothing; rinse it out and use it.
Pour in Watco.
Dip handles.
Go outside to pour remaining Watco back into can. Didn’t drip much.
Realize that it would have taken less time to just wipe the Watco on with a rag like the can says.
Step back and take photos. Blog about it.
At least I did think ahead enough to use rectangular stock in order to ensure that there would be a flat place on both sides after turning. That way, they won’t roll around on the bench when I lay them down. All in all it’s a success because even though it would have been faster in the long run to just buy some online, it was very pleasing to make my own from junk and scraps I already had. All Hail Self Sufficiency!

April 8, 2016 at 12:08 pm
THANK YOU. I literally had this exact conversation with an apple fanboy today. Apple used to be a neat company. Expensive as heck, but they had some cool toys, and some really creative ideas. Now it seems like they just take Android and make the interface look pretty. They stole the whole “clean lines, simplicity” thing from MS, they stole the third party keyboard thing from android, they stole the NFC payments thing from Android, they just make all of it look pretty and slap an Apple sticker on it. Its really irritating that they get credit for being “the greatest company ever” and “highly innovative geniuses” when in reality lots of FOSS projects (pfsense, Linux in general, OpenStack, OwnCloud, etc) deserve much more credit for making amazing things. Click http://link.mx/hool08200